Thursday, 9 August 2018
Monday, 6 August 2018
Monday, 8 May 2017
Copy and Paste Multiple Items Using Office Clipboard
Copy and Paste Multiple Items by using the Office Clipboard
The Microsoft Office Clipboard allows you to copy multiple text and graphical items from Office documents or other programs and paste them into another Office document. For example, you can copy text from an e-mail message, data from a workbook or datasheet, and a graphic from a presentation and then paste them all into a Word document. By using the Office Clipboard, you can arrange the copied items the way that you want in the document.
Copy Multiple Items to the Office Clipboard
- Open the file that you want to copy items from.
- Select the first item that you want to copy.
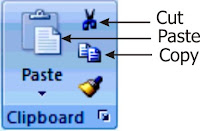
- In these Office programs: Access, Excel, Outlook, PowerPoint, or Word; on the Home tab, in the Clipboard group, click Copy or press CTRL+C on the keyboard.
- Continue copying items from the same or other files until you have collected all of the items that you want. The Office Clipboard can hold up to 24 items. If you copy a twenty-fifth item, the first item on the Office Clipboard is deleted.

If you open the Clipboard task pane in one Office program, the Clipboard task pane does not automatically appear when you switch to another Office program. However, you can continue to copy items from other programs. If the Show Status Near Taskbar When Copying option is selected, a message is displayed above the status area to indicate that an item has been added to the Office Clipboard.

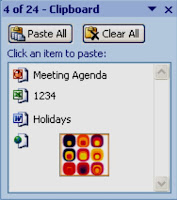
As items are added to the Office Clipboard, an entry is displayed in the Clipboard task pane. The newest entry is always added to the top. Each entry includes an icon representing the source Office program and a portion of copied text or a thumbnail of a copied graphic.
Collected items remain on the Office Clipboard until you exit all Office programs that are running on your computer or click Clear All in the Clipboard task pane. For more information, see Delete items from the Office Clipboard.

Paste Items
You can paste items from the Office Clipboard individually or all at the same time.
- Click where you want the items to be pasted and do one of the following:
- To paste items one at a time, in the Clipboard task pane, double-click each item that you want to paste.
- To paste all the items that you copied, in the Clipboard task pane, click Paste All.
- The Office Clipboard does not support the Paste Special command though it is available in Office programs.
Delete Items from the Office Clipboard
You can delete items from the Office Clipboard individually or all at the same time.

- In the Clipboard task pane, do one of the following:
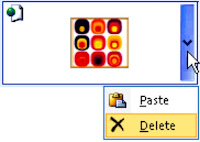
- To clear one item, click the arrow next to the item that you want to delete, and then click Delete.
- To clear all items, click Clear All.
Copying and Moving Data
Copying and Moving Data
The copy or Cut command can be used to duplicate or move highlighted data or formula. When you copy and paste, you are making a duplicate copy of the contents of one or more cells and placing the copy into another cell or range of cells, so you can copy entire cells or their contents.
On the other hand, when you cut and paste, you are removing the contents of one cell or a range from the original location and placing them into another cell or range. You can also copy or cut specific contents or attributes from the cells. For example, you can copy the resulting value of a formula without copying the formula itself, or you can copy only the formula.
When you copy a cell by dragging or by clicking Cut or Copy, and Paste icons on the Standard toolbar, Microsoft Excel copies the entire cell, including formulas and their resulting values, comments, and cell formats. If the selected copy area includes hidden cells, Microsoft Excel also copies the hidden cells. If the paste area contains hidden rows or columns, you might need to unhide the paste area to see all of the copied cells.
Move or Copy Entire Cells
- Select the cells that you want to move or copy.
- On the Home tab, in the Clipboard group, do one of the following:
- To move cells, click Cut . Keyboard shortcut is to press CTRL+X.
- To copy cells, click Copy . Keyboard shortcut is to press CTRL+C.
- Select the upper-left cell of the paste area.

Important.
To move or copy a selection to a different worksheet or workbook, click the sheet tab or switch to another workbook, and then select the upper-left cell of the paste area.
- On the Home tab, in the Clipboard group, click Paste . Keyboard shortcut is to press CTRL+V.
Important.
- To choose specific options when you paste cells, you can click the drop down arrow below Paste, and then choose your options. For instance, you can click 'Paste Special', where you can select only values, values and formulas, values and formats, etc.
- Excel replaces existing data in the paste area when you cut and paste cells to move them.
- When you copy cells, cell references are automatically adjusted. When you move cells, however, cell references are not adjusted, and the contents of those cells and of any cells that point to them may be displayed as reference errors. In this case, you will need to adjust the references manually.
Move or Copy Entire Cells by Using the Mouse
- Select the cells or range of cells you want to move or copy.
- Do one of the following:
- To move the cell(s), point to the border of the selection. When the pointer becomes a move pointer , drag the cell(s) to another location.
- To copy the cell(s), hold down CTRL while you point to the border of the selection. When the pointer becomes a copy pointer , drag the cell(s) to another location.
Insert Moved or Copied Cells between Existing Cells
- Select the cells or range of cells that contains the data you want to move or copy.
- On the Home tab, in the Clipboard group, do one of the following:
- To move the selection, click Cut.
- To copy the selection, click Copy.
- Right-click the upper-left cell of the paste area, and then click Insert Cut Cells or Insert Copied Cells on the shortcut menu.
- In the Insert Paste dialog box, click the direction to which you want to shift the surrounding cells.
These steps are use to change the location of a given data. Using these features, you can move and copy data between worksheets, workbooks, or other Windows applications. They do not replace existing data on the worksheet. Copy cell values, cell formats, or formulas only.
You can copy specific contents or attributes from the cells without copying the entire contents. For example, you can copy the resulting values of a formula without copying the formula itself, or you can copy only the formula, format of other attributes of cell(s).
When you paste copied data, you can achieve any of the following:
- Convert any formulas in the cell to the calculated values without overwriting the existing formatting.
- Paste only the cell formatting, such as font color or fill color (and not the contents of the cells).
- Paste only the formulas (and not the calculated values).
- Select the cell or range of cells that contains the values, cell formats, or formulas that you want to copy.
- On the Home tab, in the Clipboard group, click Copy.
- Select the paste area or the cell where you want to paste.
- On the Home tab, in the Clipboard group, click the arrow below Paste, and then do one of the following:
- To paste values only, click Paste Values.
- To paste cell formats only, click Paste Special, and then click Formats under Paste.
- To paste formulas only, click Formulas.
- To transpose the content, click Paste Special, and under Operation, select Transpose and the click Ok.
Transposing cell contents is changing data in column to re-arrange them in a row or vice versa.
Important.If the copied formulas contain relative cell references, Excel adjusts the references (and the relative parts of mixed cell references) in the duplicate formulas. If the copied formulas contain absolute cell references, the references in the duplicate formulas are not changed. If you don't get the results that you want, you can also change the references in the original formulas to either relative or absolute cell references and then recopy the cells.
Defining Microsoft Excel Named Reference
Defining MS Excel Named Reference
A cell reference refers to a cell or a range of cells on a worksheet and tells Microsoft Excel where to look for the values or data that you want to use in a formula. With cell references, you can use data that is contained in different parts of a worksheet in one formula, or you can use the value from one cell in several formulas. You can also refer to cells on other worksheets in the same workbook.
Although cell numbers are at the foundation of everything Excel does, it's much easier to remember names, such as Item Number and Quantity, than it is to remember cell numbers, such as A1:C100. Excel makes this easy.
A name is a meaningful shorthand or a label that makes it easier to understand the purpose of a cell reference or constant. For example, the number 210 and the text "Quarterly Earnings" constants but Quarterly Earning makes more meaning. You can use the labels on a table to refer to the cells within its columns and rows. Examples of labels are “unit Price”, “Quantity” and “Total.” Alternatively, you can create descriptive names to represent cells, ranges of cells, formulas, or constant values.
Creating Microsoft Excel Named Range
- To name a cell or range, select the range of cell(s) you want define name for.
- Type the desired name in the Name box and press ENTER key.
OR
- Right-click the selected range, click Name a Range.
- Type the desired name and click Ok.
Change Cell Reference to a Named Range
If you have defined a name to a cell reference after you have entered a cell reference in a formula, you would need to update the existing cell references to the defined names. Do one of the following:
- Select the range of cells that contains formulas in which you want to replace cell references with defined names.
- Select a single, empty cell to change the references to names in all formulas on the worksheet.
- On the Formulas tab, in the Defined Names group, click the arrow next to Define Name, and then click Apply Names.
- In the Apply names box, click one or more names, and then click Ok.


